Switch Settings
Last updated: April 29th, 2023 - 5 min. read
About this Guide
The following guide defines the embedded switching features of ReadyLinks devices.
Switch Settings
Management Mode
By default, ReadyLinks switches connect back to the ReadyView dashboard on the default untagged VLAN 1. You can change the management VLAN and uplink port setting (tagged/untagged) once the device is online and adopted into your dashboard. Create a Virtual Interface to manage your device via DHCP or a static IP address.
If your network does not allow default VLAN 1 to connect to the Internet, you will need to manually assign the management VLAN. Setup the device on a provisioning network with DHCP and apply a template that adjusts the Management VLAN and uplink type.
Management mode options:
ReadyView: Management mode ReadyView blocks all management access outside of ReadyView.
VLAN: Management mode VLAN blocks all management access outside of the specified management VLAN.
Disabled: Management mode disabled allows management access on all virtual interfaces.
*Note: When provisioning a new management interface you need to ensure the device has access to the new management network, otherwise you will lose communication to the device.
GL-24xT-P600D# configure terminal
GL-24xT-P600D(config)# management mode
disable                   - general management mode
port-based                - port based management mode
readyview                 - readyview management mode
vlan                      - management vlan mode
DoS Prevention
ReadyLinks devices come equipped with a number of mechanisms that can be enabled to prevent common denial of service (DoS) attacks and protect the CPU of your device.
DoS security options:
DOS Protection Land: A LAND Attack is a Layer 4 Denial of Service (DoS) attack in which, the attacker sets the source and destination information of a TCP segment to be the same. A specially crafted TCP SYN packet is created such that the source IP address and port are set to be the same as the destination address and port, which in turn is set to point to an open port on a victim’s device. A vulnerable device would receive such a message and reply to the destination address effectively sending the packet for reprocessing in an infinite loop. Enabling this DoS protection setting prevents the device from crashing or freezing due to the packet being repeatedly processed by the TCP stack.
DOS Protection TCP Null Scan: In case of TCP Null Attack, the victim device gets packets with null parameters in the ‘flag’ field of the TCP header, i.e. none of the 6 TCP flags (URG, ACK, PSH, RST, SYN, FIN) is set. As a rule, packets of this kind are used to scan the server’s ports before a large-scale attack. Enabling this DoS protection setting prevents a TCP Null Scan of the device.
DOS Protection TCP Syn Fin Scan: In SYN scanning, the threat actor attempts to set up a Transmission Control Protocol/Internet Protocol (TCP/IP) connection with a device at every possible port. This is done by sending a SYN (synchronization) packet, as if to initiate a three-way handshake, to every port on the device. If the device replies with an ACK (acknowledgement) response -- or SYN/ACK (synchronization acknowledged) packet -- from a particular port, it means the port is open. Then, the hostile client sends an RST (reset) packet. Enabling this DoS protection setting prevents a TCP Syn Fin Scan of the device.
DOS Protection TCP XMAS Scan: An XMAS scan is similar to the other scan types, and is also used to determine the state of the replying device. These scans are designed to manipulate the PSH, URG, and FIN flags of the TCP header to identify listening ports on the targeted device. Enabling this DoS protection setting prevents an XMAS scan from taking place on the device.
GL-24xT-P600D# configure terminal
GL-24xT-P600D(config)# dos-protection
 land                      - enable land attack
 tcp-null-scan             - enable tcp null scan
 tcp-syn-fin-scan          - enable tcp syn fin scan
 tcp-xmas-scan             - enable tcp xmas scan
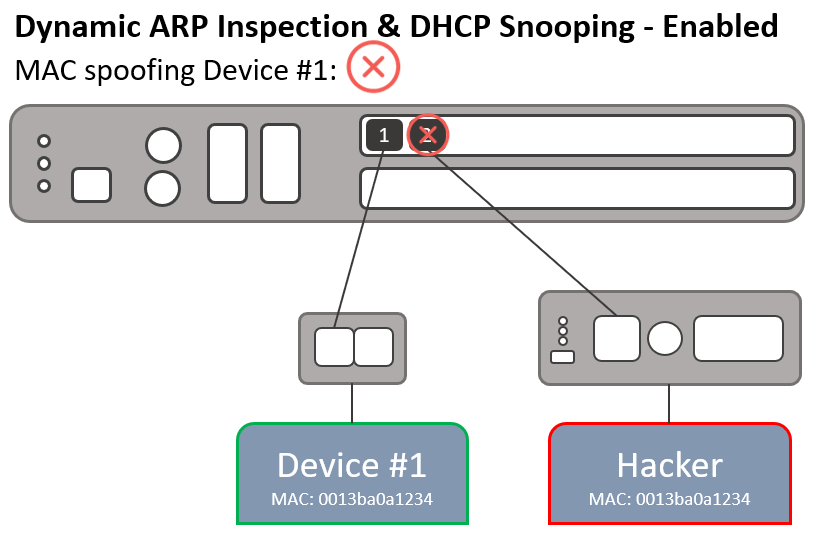
DHCP Snooping
DHCP Snooping examines DHCP packets and maintains a table of DHCP leases seen on the network. It also allows you to set uplink ports to trust DHCP traffic and set downlink ports to untrusted.
DHCP Snooping can be used in conjunction with Dynamic ARP Inspection to provide additional layer 2 security to your network and prevent common network attacks such as DHCP spoofing or ARP spoofing.
GL-24xT-P600D# configure terminal
GL-24xT-P600D(config)# ip dhcp snooping
DHCP Protective Down Recover
DHCP Protective Down Recover monitors the DHCP traffic across ports with a DHCP rate limit set and automatically enables ports that have been auto disabled by the DHCP rate limit.
DHCP Protective Down Recover is used in conjunction with DHCP rate limits set on individual ports. Set the down recover interval to dictate how long the port will stay disabled until it is automatically enabled.
GL-4xTH-RPF# configure terminal
GL-4xTH-RPF(config)# ip dhcp protective-down recover
DHCP recover has been configed successfully.
GL-4xTH-RPF(config)# ip dhcp protective-down recover interval
 interval                - 10-86400 sec
GL-4xTH-RPF(config)# ip dhcp protective-down recover interval 10
DHCP recover interval has been configed successfully.
GL-4xTH-RPF(config)# exit
GL-4xTH-RPF# show ip dhcp rate-limit
DHCP recover: enabled.
DHCP recover interval : 10 s

PORT               RATE LIMIT STATE    RATE(pps)    Counter(pps)
--------------------------------------------------------------------------
Ghn1                    enabled           15            0
Ghn2                    enabled           15            0
Ghn3                    enabled           15            0
Ghn4                    enabled           15            0
Fiber G1               disabled           15            0
Fiber G2               disabled           15            0
MGMT                   disabled           15            0
Dynamic ARP Inspection
Dynamic ARP Inspection (DAI) is a security feature in ReadyLinks switches that protects networks against man-in-the-middle ARP spoofing attacks. DAI inspects Address Resolution Protocol (ARP) packets on the LAN and uses the information in the DHCP snooping table on the switch to validate ARP packets. DAI performs validation by intercepting each ARP packet and comparing its MAC and IP address information against the MAC-IP bindings contained in the DHCP snooping table. Any ARP packets that are inconsistent with the information contained in the DHCP snooping table are dropped.
GL-24xT-P600D# configure terminal
GL-24xT-P600D(config)# vlan 1
GL-24xT-P600D(vlan1)# arp-inspection
ARP Protective Down Recover
ARP Protective Down Recover monitors the ARP traffic across ports with a ARP rate limit set and automatically enables ports that have been auto disabled by the ARP rate limit.
ARP Protective Down Recover is used in conjunction with ARP rate limits set on individual ports. Set the down recover interval to dictate how long the port will stay disabled until it is automatically enabled.
GL-4xTH-RPF# configure terminal
GL-4xTH-RPF(config)# arp protective-down recover
ARP recover has been configed successfully.
GL-4xTH-RPF(config)# arp protective-down recover interval
 interval                - 10-86400 sec
GL-4xTH-RPF(config)# arp protective-down recover interval 10
ARP recover interval has been configed successfully.
GL-4xTH-RPF(config)# exit
GL-4xTH-RPF# show arp rate-limit
ARP recover: enabled.
ARP recover interval : 10 s

PORT               RATE LIMIT STATE    RATE(pps)    Counter(pps)
--------------------------------------------------------------------------
Ghn1                    enabled           15            0
Ghn2                    enabled           15            0
Ghn3                    enabled           15            0
Ghn4                    enabled           15            0
Fiber G1               disabled           15            0
Fiber G2               disabled           15            0
MGMT                   disabled           15            0
Loop Detection
Loop detection helps prevent network downtime in the event a loop occurs. This feature is by default disabled in ReadyLinks switches. It sends a loop-detection control packet and monitors those to detect the loop and shutdown any affected ports. Each switch with loop detection enabled will periodically generate broadcast probe packets that are sent out on every active port. The default period is 30 seconds. Each port with loop detection enabled can be set to detect loops and automatically shutdown the port in the event a loop occurs.
Loop detection: A global device setting that enables loop detection on the switch.
Loop detection interval: A global device setting that dictates the interval at which the broadcast probe packets are generated.
Loop detection admin: A port setting that enables loop detection on a port. This setting must be enabled in conjuction with the Loop detection global setting.
Loop detection control: A port setting that allows the port to shutdown in the event a loop is detected. This setting must be enabled in conjuction with the Loop detection and Loop detection admin settings.
GL-24xT-P600D# configure terminal
GL-24xT-P600D(config)# loop-detection
GL-24xT-P600D(config)# interface ethernet RJ45/G1
GL-24xT-P600D(RJ45/G1)# loop-detection
GL-24xT-P600D(RJ45/G1)# loop-detection control
DHCP Server
The ReadyLinks GL-x series switches have a built-in DHCP service. When enabled, it can provide DHCP to a configured subnet on a specified VLAN.
VLAN: Specify the VLAN this DHCP server will reside on.
Start IP: The first IP address of the range to be handed to clients.
End IP: The last IP address of the range to be handed to clients.
Subnet Mask: The subnet mask to hand to clients.
Gateway: The default gateway IP address that should be given to clients on the subnet. This address must be in the same subnet as the clients.
Lease time: How long (minutes) clients will have an address allocated to them, before the lease expires the client must renew.
GL-24xT-P600D# configure terminal
GL-24xT-P600D(config)# ip dhcp server
 dns                       - configure DHCP Server DNS
 lease                     - configure DHCP Server lease time
 start-ip                  - configure a start IP address of DHCP Server
 vlan                      - VLAN ID(1-4094)
Multicast Settings
IP multicast is a method of sending Internet Protocol (IP) datagrams to a group of interested receivers in a single transmission. It is often employed for streaming media applications on the Internet and private networks. Since traffic is sent from the source once in total, instead of once per recipient, throughput can be saved. Each host (and in fact each application on the host) that wants to be a receiving member of a multicast group (i.e. receive data corresponding to a particular multicast address) must use the Internet Group Management Protocol (IGMP) to join. IGMP snooping is the process of listening to IGMP network traffic. The feature allows a network switch to listen in on the IGMP conversation between hosts and routers. By listening to these conversations the switch maintains a map of which links need which IP multicast streams. Multicasts are filtered from the links which do not need them and thus controls which ports receive specific multicast traffic
IGMP Snooping: Enable IGMP snooping to prevent the switch from sending multicast traffic to hosts who are not joined with the multicast group.
Fast leave: Allows the device to immediately remove a port from the forwarding entry for a multicast group when the port receives a leave message.
Host timeout: The host timeout (seconds) value determines how long a switch waits to receive an IGMP query from a multicast router before removing a multicast group from its multicast cache table.
Leave wait: Set the wait time before stopping traffic to a port when a leave message is received.
Max response time: When a host receives a query packet, it starts counting to a random value, less that the maximum response time. When this timer expires, the host replies with a report, provided that no other host has responded yet.
Route timeout: The aging time (seconds) of the multicast router ports.
IGMP Querier: Enable the bulit-in IGMP querier on the switch.
Query transmit interval: How long (seconds) a query from the IGMP querier will be transmitted onto the network. Must be used in conjuction with the IGMP querier.
GL-24xT-P600D# configure terminal
GL-24xT-P600D(config)# ip igmp snooping
 host-aging-time           - set host aging time
 immediate-leave           - enable immediate-leave of igmp snooping
 leave-wait                - set leave wait
 max-response-time         - set max response time
 querier                   - enable IGMP querier
 query-interval            - set query transmit interval
 router-aging-time         - set IGMP Snooing router aging time
TACACS+
TACACS (Terminal Access Controller Access Control System) is a security protocol that provides centralized validation of users who are attempting to gain access to a ReadyLinks device. TACACS+ provides separate authentication, authorization and accounting services.
Adding a TACACS+ Server:IP Address: Enter the IP address of your TACACS+ server.
TCP Port ID: TACACS+ server port ID.
Key: TACACS+ key.
GL-24xT-P600D# configure terminal
GL-24xT-P600D(config)# tacacs-server host {ip_address} port {port_id} key {key}
Auto Reboot
Auto reboot is a useful function when troubleshooting a network, but is not recommended for continued use in production networks. When enabled, this feature will cause the device to automatically reboot if it is unable to ping its gateway. A ping to the gateway is sent every 10 seconds when this feature is enabled.
Important notes:ping-not-respond-count: The number of pings that must fail before the device auto-reboots.
reset-count: The number of times the device will reboot.
GL-24xT-P600D# configure terminal
GL-24xT-P600D(config)# auto-reset
 disable                   - disable auto-reset function
 enable                    - enable auto-reset function
 ping-not-respond-count    - set auto-reset ping not respond times
 reset-count               - set auto-reset times
GL-24xT-P600D(config)# auto-reset enable
Set Auto Reset Function Enable successfully.
GL-24xT-P600D(config)# end
GL-24xT-P600D# show auto-reset
Auto Reset Configuration is:
        Auto-Reset:Enable
        Auto-Reset State:Running
        Auto-Reset Reset Count:5
        Auto-Reset Ping Count:5
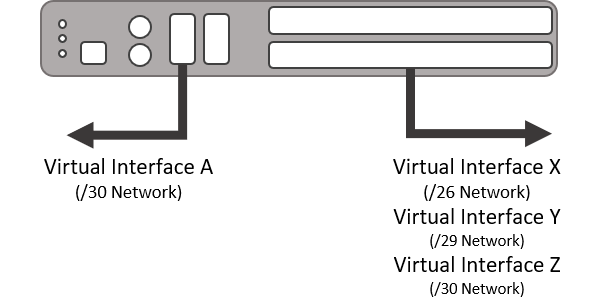
Management Interface Settings
By default, ReadyLinks switches come with one virtual interface on VLAN 1 set as a DHCP client. The devices connect back to the ReadyView dashboard on the default untagged VLAN 1. You can change the management VLAN and uplink port setting (tagged/untagged) once the device is online and adopted into your dashboard.
If your network does not allow default VLAN 1 to connect to the Internet, you will need to manually assign the management VLAN. Setup the device on a provisioning network with DHCP and apply a template that adjusts the Management VLAN and uplink type.
GL-24xT-P600D# configure terminal
GL-24xT-P600D(config)# interface vlan 1
GL-24xT-P600D(vlan-interface1)#
 end                       - exit from current environment
 exit                      - exit to root prompt
 ip                        - IP
 ipv6                      - IPv6
 no                        - disable a protocol/funtion, or restore port default configuration
IP Routing
IP routing is enabled by default when you create a new virtual interface. This means you can use your virtual interfaces to setup IP routes on your device.
DHCP Trust
With DHCP snooping enabled globally on the switch, you can set ports to trust or untrust DHCP pakcets that traverse those ports.
GL-24xT-P600D# configure terminal
GL-24xT-P600D(config)# ip dhcp snooping interface ethernet Fiber/G1 trust
DHCP Rate Limit
With DHCP rate limiting set on a port, the port will automatically disable when the DHCP packets per second exceeds the rate limit that is set.
Use DHCP rate limiting in conjunction with DHCP Protective Down Recover to automatically re-enable ports that are shutdown due to rate limiting.
GL-4xTH-RPF# configure terminal
GL-4xTH-RPF(config)# interface ethernet Ghn1
GL-4xTH-RPF(Ghn1)# ip dhcp rate-limit rate 100
DHCP rate has been configed successfully.
GL-4xTH-RPF(config)# exit
GL-4xTH-RPF# show ip dhcp rate-limit
DHCP recover: enabled.
DHCP recover interval : 10 s

PORT               RATE LIMIT STATE    RATE(pps)    Counter(pps)
--------------------------------------------------------------------------
Ghn1                    enabled           100            0
Ghn2                    enabled           15            0
Ghn3                    enabled           15            0
Ghn4                    enabled           15            0
Fiber G1               disabled           15            0
Fiber G2               disabled           15            0
MGMT                   disabled           15            0
ARP Trust
With Dynamic ARP inspection enabled on a VLAN, you can set ports to trust or untrust ARP pakcets that traverse those ports.
GL-24xT-P600D# configure terminal
GL-24xT-P600D(config)# interface ethernet Fiber/G1
GL-24xT-P600D(Fiber/G1)# arp-inspection trust
ARP Rate Limit
With ARP rate limiting enabled and a rate limit set on a port, the port will automatically disable when the ARP packets per second exceeds the rate limit that is set.
Use ARP rate limiting in conjunction with ARP Protective Down Recover to automatically re-enable ports that are shutdown due to rate limiting.
GL-4xTH-RPF# configure terminal
GL-4xTH-RPF(config)# interface ethernet Ghn1
GL-4xTH-RPF(Ghn1)# arp rate-limit rate 100
ARP rate has been configed successfully.
GL-4xTH-RPF(config)# exit
GL-4xTH-RPF# show arp rate-limit
ARP recover: enabled.
ARP recover interval : 10 s

PORT               RATE LIMIT STATE    RATE(pps)    Counter(pps)
--------------------------------------------------------------------------
Ghn1                    enabled           100            0
Ghn2                    enabled           15            0
Ghn3                    enabled           15            0
Ghn4                    enabled           15            0
Fiber G1               disabled           15            0
Fiber G2               disabled           15            0
MGMT                   disabled           15            0
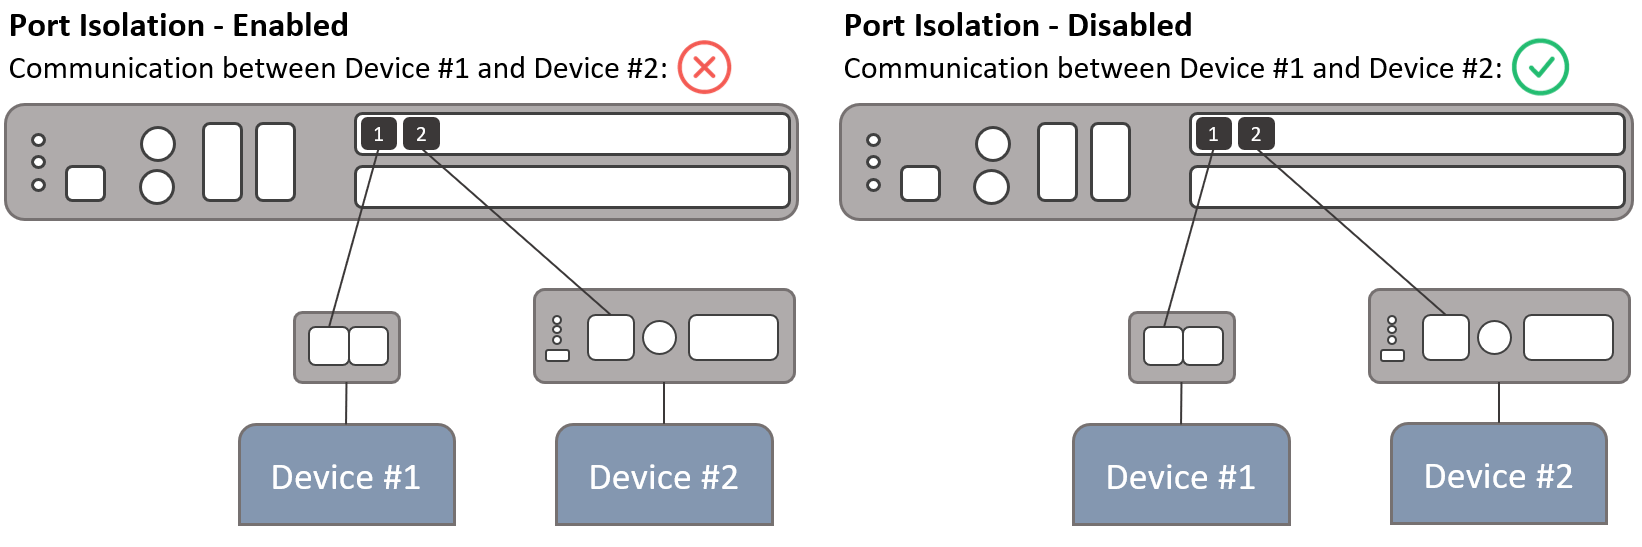
Port Isolation
Port isolation provides layer 2 isolation between protected ports on a switch. By default, ReadyLinks switches do not isolate WAN facing ports, but enables port isolation on ReadyLinks LAN ports.
GL-24xT-P600D# configure terminal
GL-24xT-P600D(config)# interface ethernet Fiber/G1
GL-24xT-P600D(Fiber/G1)# switchport protected
Rate Limit
Set rate limits on individual ports to impose a throughput ceiling on the port. Rate limits can be set asymmetrically meaning the upload limit and the download limit do not need to match.
Loop Detection
Loop detection helps prevent network downtime in the event a loop occurs. This feature is by default disabled in ReadyLinks switches. It sends a loop-detection control packet and monitors those to detect the loop and shutdown any affected ports. Each switch with loop detection enabled will periodically generate broadcast probe packets that are sent out on every active port. The default period is 30 seconds. Each port with loop detection enabled can be set to detect loops and automatically shutdown the port in the event a loop occurs.
Loop detection: A global device setting that enables loop detection on the switch.
Loop detection interval: A global device setting that dictates the interval at which the broadcast probe packets are generated.
Loop detection admin: A port setting that enables loop detection on a port. This setting must be enabled in conjuction with the Loop detection global setting.
Loop detection control: A port setting that allows the port to shutdown in the event a loop is detected. This setting must be enabled in conjuction with the Loop detection and Loop detection admin settings.
GL-24xT-P600D# configure terminal
GL-24xT-P600D(config)# loop-detection
GL-24xT-P600D(config)# interface ethernet RJ45/G1
GL-24xT-P600D(RJ45/G1)# loop-detection
GL-24xT-P600D(RJ45/G1)# loop-detection control
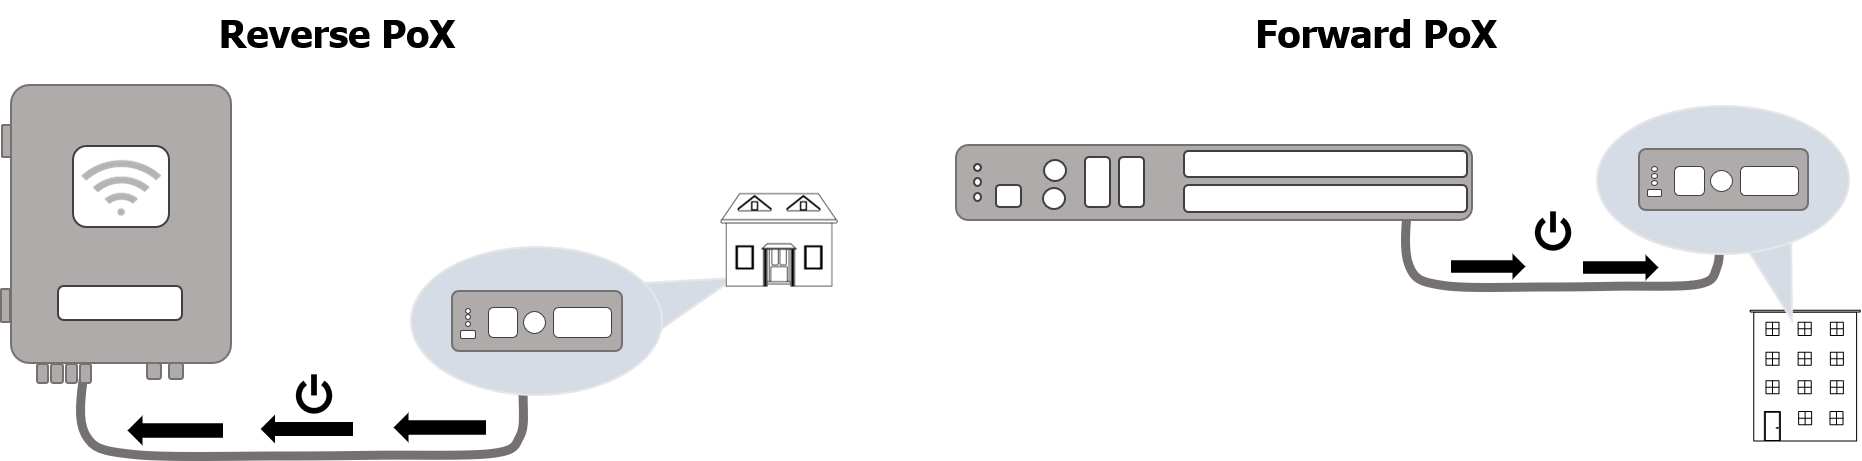
PoE / PoX™
Power over Ethernet (PoE) is a technology that passes electric power over twisted-pair Ethernet cable to powered devices (PD), such as wireless access points, IP cameras, and VoIP phones in addition to the data that the cable usually carries. Most ReadyLinks switches and client devices support PoE/PoE+/PoE++, refer to the individual device specifications for details about each port's capabilities.
Power over X (PoX™) is a ReadyLinks technology that applies electric power over any cable. This allows you to power the ReadyLinks client device without the need of a local power source. Additionally, the client device will convert the additional power provided by PoX and output PoE/PoE+ depending on its capabilities.
GL-24xT-P600D# configure terminal
GL-24xT-P600D(config)# interface ethernet Ghn1
GL-24xT-P600D(Ghn1)# power inline poe-mode
 mode             - poe, poe-plus, poe-plus-plus, force_power
Max Mac Learn
Max mac learn specifies the maximum amount of mac addresses allowed to connect to a port. By default, there is no maximum set on any port. *Note: There will always be two mac addresses for any ReadyLink connection. One mac address is allocated for the port itself (domain master) and the other mac address is learned when the client device (end point) connects. So if you would like to limit a port to a single connected device, the max mac setting should be set to 3.
GL-24xT-P600D# configure terminal
GL-24xT-P600D(config)# interface ethernet Ghn1
GL-24xT-P600D(Ghn1)# port-security maximum
 mac-maxmum              - 1-1024