Configuration templates
Build a reusable switch configuration once, then apply it to switches by hand, at claim time, or automatically by tag.
A configuration template is a complete switch configuration for one model: device settings, users, VLANs, interfaces, and per-port settings. You build it once and apply it to every switch of that model, so switches at a site stay consistent. For advice on how to structure templates, see Template best practices.
#How templates and switches relate
Keep two actions apart:
- Saving a template changes the template only. Switches already using it keep their running configuration until you apply the template again.
- Applying a template to a switch overwrites the switch's running configuration with the template.
A switch's Configuration row shows which template it is bound to, or Unbound if none.
#The template list
Open Administration > Configuration Templates. Your role needs access to templates to see this page.
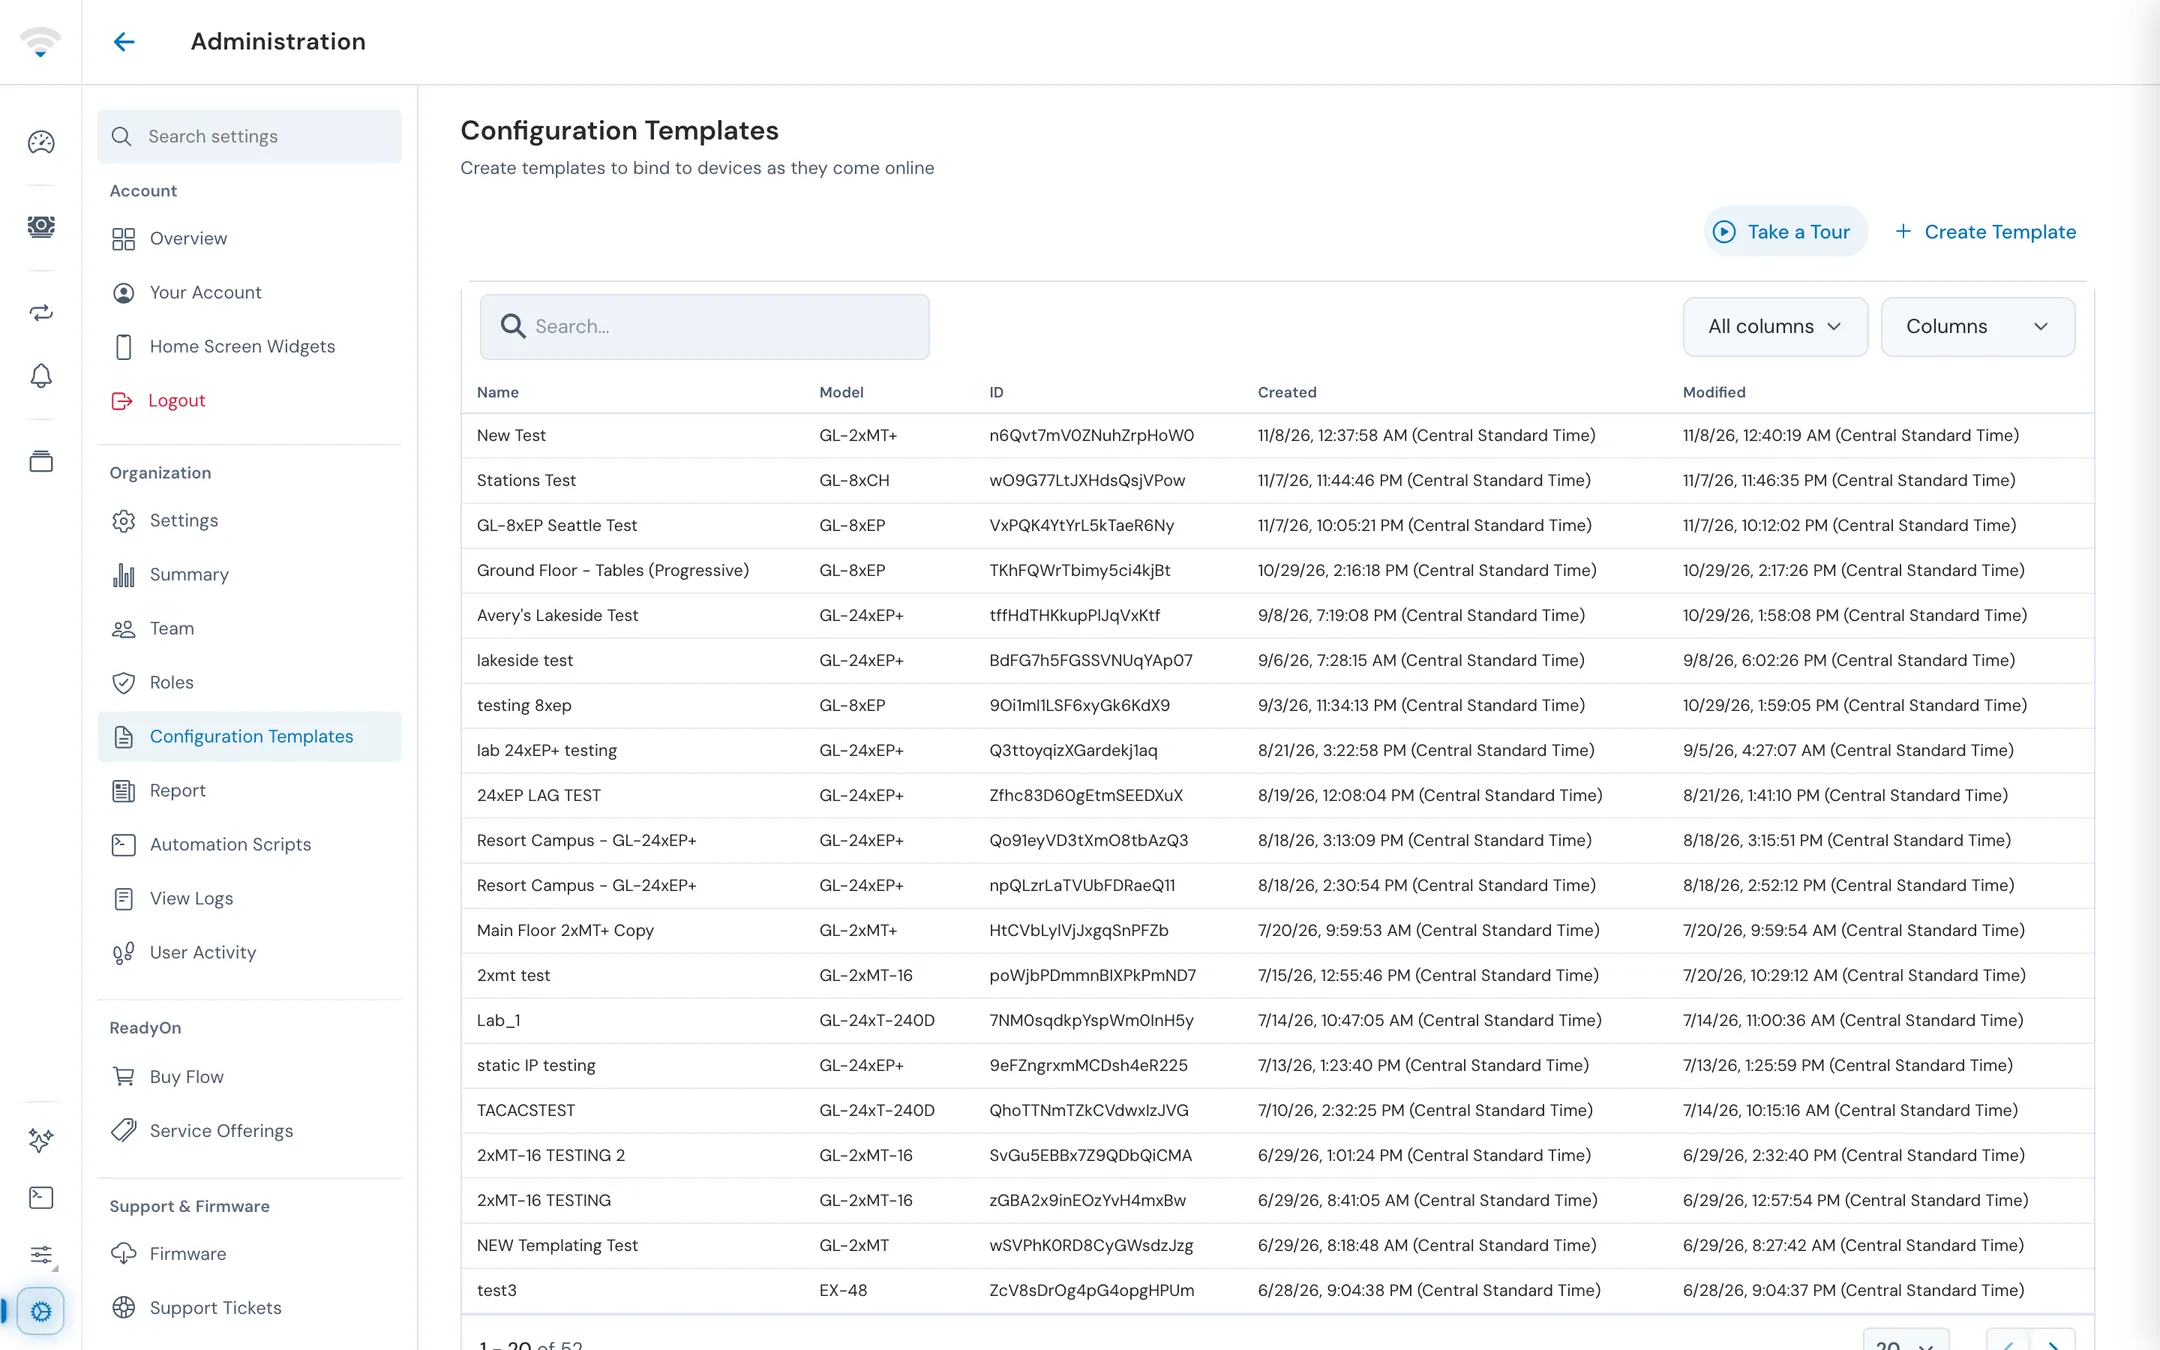
| Column | What it shows |
|---|---|
| Name | The template's name |
| Model | The switch model it's built for |
| ID | The template's ID |
| Created | When it was created |
| Modified | When it was last saved |
The newest templates are listed first. Click a template to open it in the editor. Click Take a Tour for a guided walkthrough.
#Create a template
- Click Create Template.
- Under Configuration, choose Create new, or Clone to copy an existing template. Clone appears once you have at least one template.
- If you're cloning, pick the template to copy. Each one is listed as name | model.
- Enter a Name.
- If you're creating a new template, choose the Model. A cloned template keeps the model of the one you copied.
- Tick Revision Tracking to keep a copy of each saved version.
- Click Save.
The new template opens in the editor.
#Edit a template
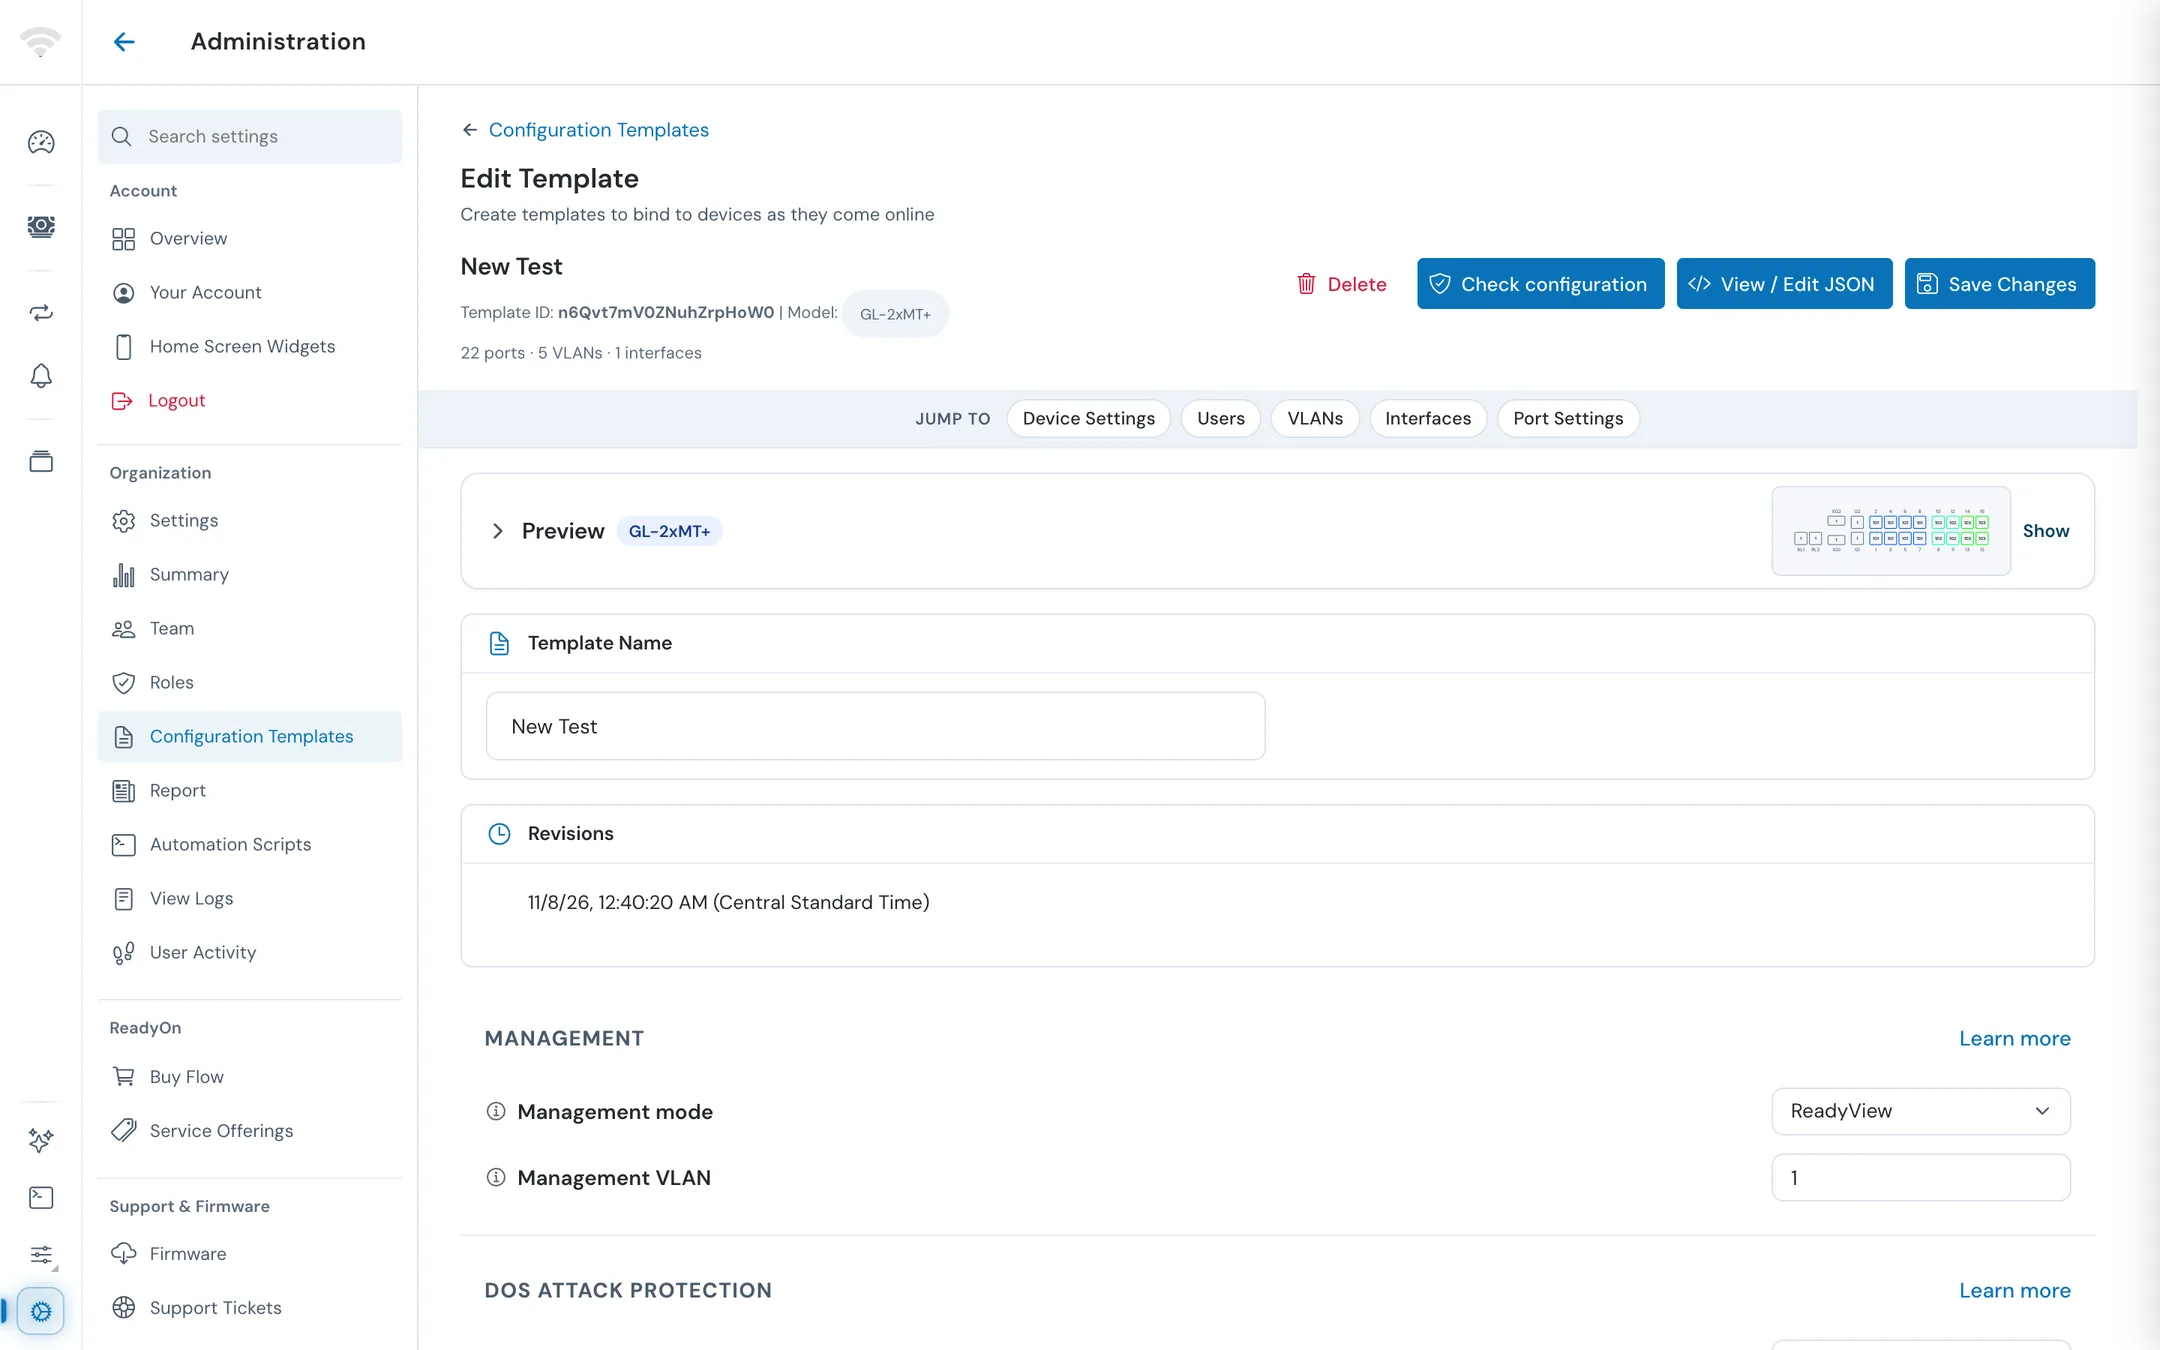
The header shows the template's name, its ID, its model, and a count of its ports, VLANs, and interfaces. Use Jump to to move to Device Settings, Users, VLANs, Interfaces, or Port Settings. Preview shows the model's ports.
| Card | What you set there |
|---|---|
| Template Name | The name shown in the list and on switches |
| Revisions | Saved versions, when revision tracking is on. Click one to load it into the editor; save to keep it |
| Device Settings | Switch-wide settings in sections such as Management, DNS, DHCP Snooping, LLDP, VectorBoost, SNTP, Spanning Tree, Link Aggregation, Multicast Settings, TACACS+, Syslog, SNMP, DHCP Server, Bandwidth Profiles, and MQTT |
| Users | Local switch accounts. Click Create User to add a username and privilege |
| VLANs | The template's VLANs. Click Add VLAN, or type several IDs separated by commas to create them at once. The Synced networks part of this card links sites whose VLANs stay in step with the template. See Keep VLANs in step with a site |
| VLAN Models | VLAN models for clients. Click Create Model |
| Interfaces | Layer 3 interfaces. Click Add Interface, then set the VLAN, the type, and the IPv4 address, subnet mask, and gateway |
| Port Settings | The settings for each port. Select ports and click Batch Provision to change several at once |
Per-port settings for a feature stay locked until you turn that feature on in Device Settings.
The VectorBoost section says it "cancels crosstalk between G.hn lines in the same cable bundle". Here "G.hn lines" means ReadyLink connections over twisted pair (phone line); VectorBoost applies to those ports only.
#Check the template before saving
Click Check configuration to look for settings that contradict each other. The Configuration check panel lists errors, warnings, and notes. Click Go to next to an item to jump to the setting. When nothing is wrong, it says the template is consistent.
#Save your changes
An Unsaved changes label appears as soon as you edit something.
- Click Save Changes, or press Ctrl+S (⌘S on a Mac).
- If a value is out of range, ReadyView stops the save and tells you which one. Fix it and try again.
- If the check finds errors or warnings, choose Review to look at them or Save anyway.
- Confirm the save. Switches bound to the template keep their running configuration until you apply the template again.
#Edit the JSON
Click View / Edit JSON to edit the template exactly as it is stored. Format tidies the text and Revert undoes your edits. Applying the JSON loads it into the form; nothing is written until you save the template. The template's model can't be changed here.
#Delete a template
Click Delete and confirm. Deleting a template doesn't wipe the configuration of switches that used it.
#Keep VLANs in step with a site
The Synced networks part of the VLANs card links the template to sites so their VLAN lists match.
- Click Sync with network and tick one or more sites.
- Check the preview of the site VLANs that linking adds to the template, then click Sync with N network(s).
- Save the template.
When you save, any of the template's VLANs a synced site is missing are added to that site. VLANs added to the template are added to synced sites too. Removing a VLAN from the template never removes it from a site. To unlink a site, use Stop syncing with next to it.
A site's Settings > Networks page lists the templates synced with it. See Site settings.
#Apply a template to a switch
- Open the switch, go to its Settings tab, and find the Firmware & Template section.
- In Template, choose the template. The list shows templates built for the switch's model. If there are none, the Configuration row reads None Available with a Create link.
- Read the confirmation: applying overwrites all running configuration on the switch.
- If the switch offers a choice, pick Apply settings (no reboot), or Full configuration restore (switch reboots). A full restore downloads the full configuration, replaces the switch's saved configuration, and reboots it (about 3 minutes offline).
- Confirm. The Configuration row shows progress, then the template's name.
Your role needs permission to apply templates.
#Apply a template to several switches
- On the site's Switches list, select the switches.
- In the selection bar, click Config, then Template.
- Choose the template, then click Apply Template and confirm.
#Apply templates automatically
- When you claim a switch: choose a Configuration Template in the claim form. Templates are grouped by model, and a template built for a different model isn't applied. See Adding devices.
- When a switch comes online: turn on Auto-apply templates in the site's Settings > General. The switch's assigned template is applied once it comes online.
- By tag: in the same page's Tags card, add Template rules that give devices with a tag the template chosen for their model. A template picked on a device itself always wins. Rules do nothing while Auto-apply templates is off.
While Auto-apply templates is on, the site's switch settings are locked, because the templates take priority.
#See template status across your organization
Administration > Summary has a Configuration Status card that counts devices that are Up to Date, Out of Sync, Pending Updates, Updating, Unbound, or have No Template Support. Click Configuration Templates there to open the template list.
#Related guides
Last updated November 10, 2026