Sites
Use the organization Dashboard to check every site's health, filter and tag sites, and create new ones.
A site is one location on your network, such as a building or a campus, and the devices installed there. The organization Dashboard lists every site you can see, shows which ones need attention, and is where you create new sites. Open it with Dashboard, the first icon in the left rail.
#Check site health
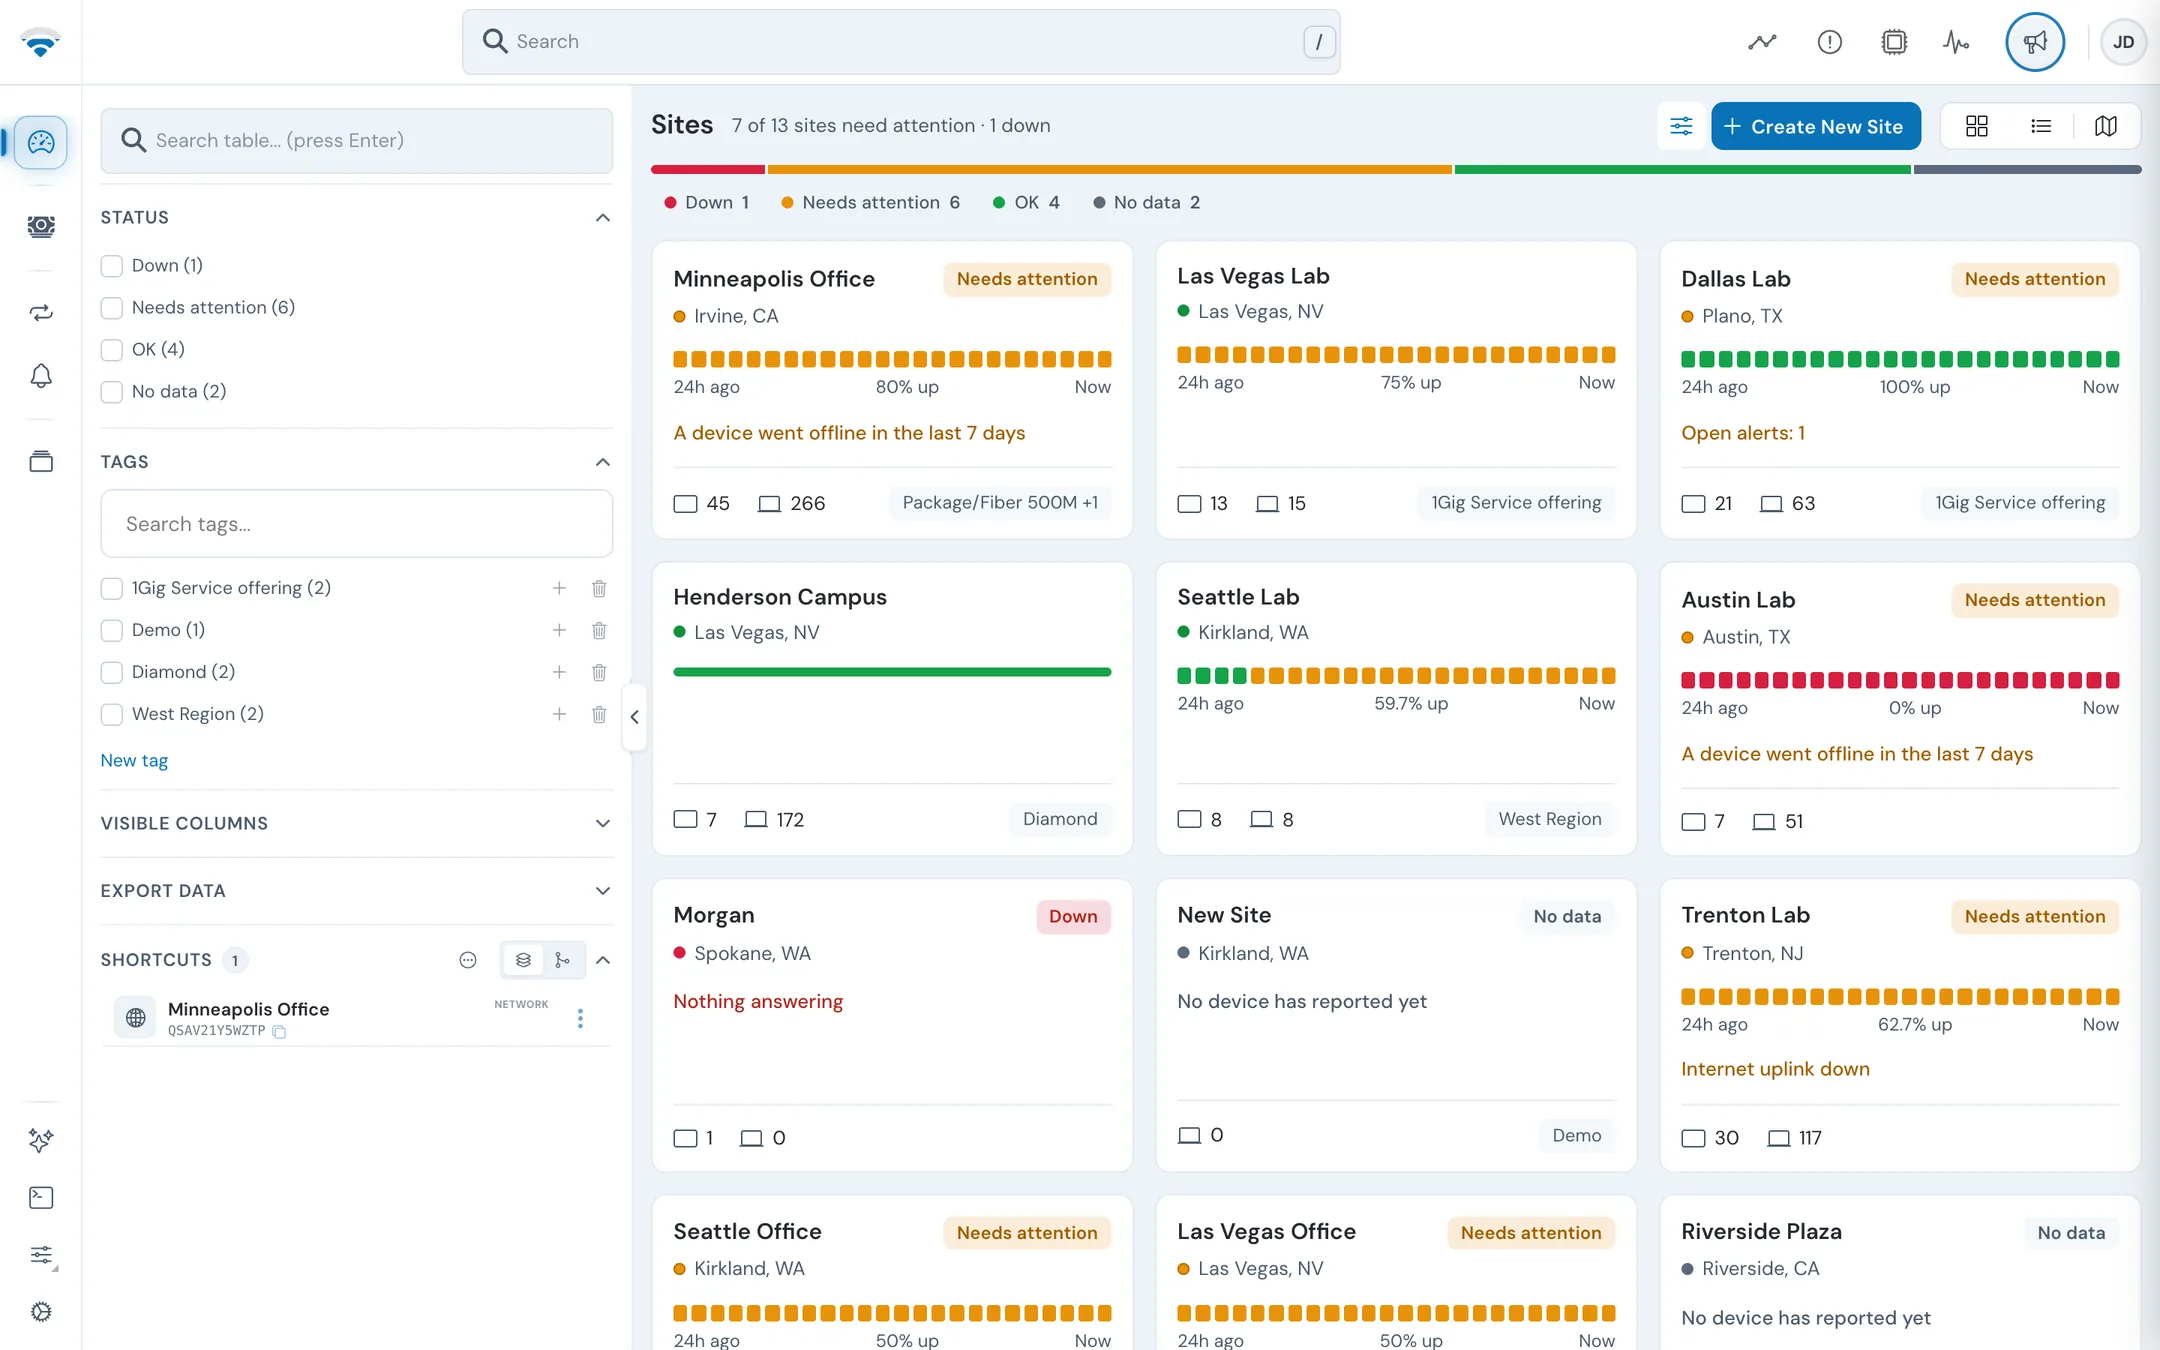
The Sites header shows how many sites need attention and how many are down. Below it, four chips sort every site by health, each with a count:
| Chip | Meaning |
|---|---|
| Down | Nothing at the site is answering. |
| Needs attention | The site is up, but a device is offline or alarming, a device has an open alert, or its internet uplink is down or slow. |
| OK | Every device at the site is answering and nothing is flagged. |
| No data | No device at the site has reported yet. |
Hover over a chip to see its definition. Click a chip to show only those sites, and click it again to show them all.
#Read a site card
Each card shows:
- the site's name, its health, and its city and state;
- a 24-hour uptime strip with one block per hour (green for up, amber for partly up, red for down) and the percentage of time the site was up;
- when the site isn't OK, a line saying why, such as A device went offline in the last 7 days or An internet uplink is down;
- Infrastructure and IoT Devices counts. Hover over them to see how many are online;
- the site's first tag, with +1, +2 and so on when it has more.
The reasons ReadyView gives include an uplink that's down, packet loss above 2% or latency above 150 ms on an uplink, a device that went offline in the last 7 days, a device with an open alert, and a client that's offline or alarming.
Click a card to open the site. Its site dashboard opens.
#Card actions
Hover over a card to show three buttons:
| Button | What it does |
|---|---|
| Manage tags | Add or remove the site's tags. |
| Topology | Opens the site's topology. |
| Settings | Opens the site's settings. |
#Choose a view
Use the Cards / List / Site map switch at the top right of the page.
- Cards shows one card per site, as described above.
- List shows the sites in a table. Choose its columns under Visible Columns in the filter panel. The table shows 20 sites per page; you can change that to 10, 30, 40, or 50.
- Site map shows the sites on a map. Click a site to open it.
Every view shows only the sites that match your filters.
#Filter the sites
The panel to the left of the sites holds the filters. Each section opens and closes when you click its heading.
| Section | What it does |
|---|---|
| Status | Tick Down, Needs attention, OK, or No data to show only sites in those states. |
| Tags | Tick tags to show only sites with those tags. See Organize sites with tags. |
| Visible Columns | Choose the columns the List view shows: Name, Tags, Host, Status, Devices, Clients, Internet, Alerts, Updates, WAN, ISP, Updated, Street, City, Zip Code, and State. |
| Export Data | Click Export to Excel to download the sites as a spreadsheet. |
| Shortcuts | Quick links you've pinned. See Keep shortcuts. |
To search the list, type in Search table... (press Enter) and press Enter.
#Organize sites with tags
Tags group sites, for example by region or service plan. A tag can hold sub-tags, so you can build groups such as a region with its buildings under it.
Create a tag:
- In the Tags section, click New tag.
- Type the tag's name. To place it under an existing tag, choose that tag in Nest under, or type the path with a slash, for example
Building/Floor 2. - Click Add, or press Enter.
To add a sub-tag to an existing tag, click Add sub-tag (+) next to it. To remove a tag, click Delete (trash can) next to it.
Filter by tags: tick one or more tags. When you tick two or more, a Match switch appears:
- Any shows sites with any of the ticked tags.
- All shows only sites with every ticked tag.
Use Search tags... to find a tag in a long list.
#Tag several sites at once
- Hover over a card and tick its checkbox. Tick every other site you want.
- In the bar that appears, choose a tag in Choose tag....
- Click Apply tag to add it to the selected sites, or Remove tag to take it off.
Applying and removing tags needs the Update Network permission. See Roles and permissions.
If any selected site has a ReadyWall firewall, the bar also offers Update firmware, Back up, Apply template, and Site VPN for those firewalls. Each opens a ReadyWalls at the selected sites dialog. See Firewalls for what each action does.
#Keep shortcuts
Shortcuts keeps quick links to the sites, devices, and ports you open often. They show on the organization Dashboard and in the same panel on each site dashboard.
- Add a shortcut: drag a site, device, or port into the Shortcuts section.
- Use a shortcut: click it, or open its menu for Open Details, Pin to Top, Copy MAC Address, and Remove from Panel.
- Change the layout: switch between Stack View and Hierarchy View.
- Search: a search box appears once you have more than five shortcuts.
- Clear them all: click Bulk Actions (⋯), then Clear All Shortcuts. This can't be undone.
#Customize the Dashboard
By default the Dashboard shows just the sites. To add more cards:
- Click Customize at the top of the page.
- Click Add widgets. The Dashboard Widgets library opens.
- Pick a widget, such as Fleet status, Open issues, Network Health, or Alarms, and click Add to dashboard.
- Drag cards to reorder them, resize them, or hide the ones you don't want.
- Click Done.
To go back to the original layout, click Customize, then Reset.
#Create a site
You need the Create Network permission to create a site.
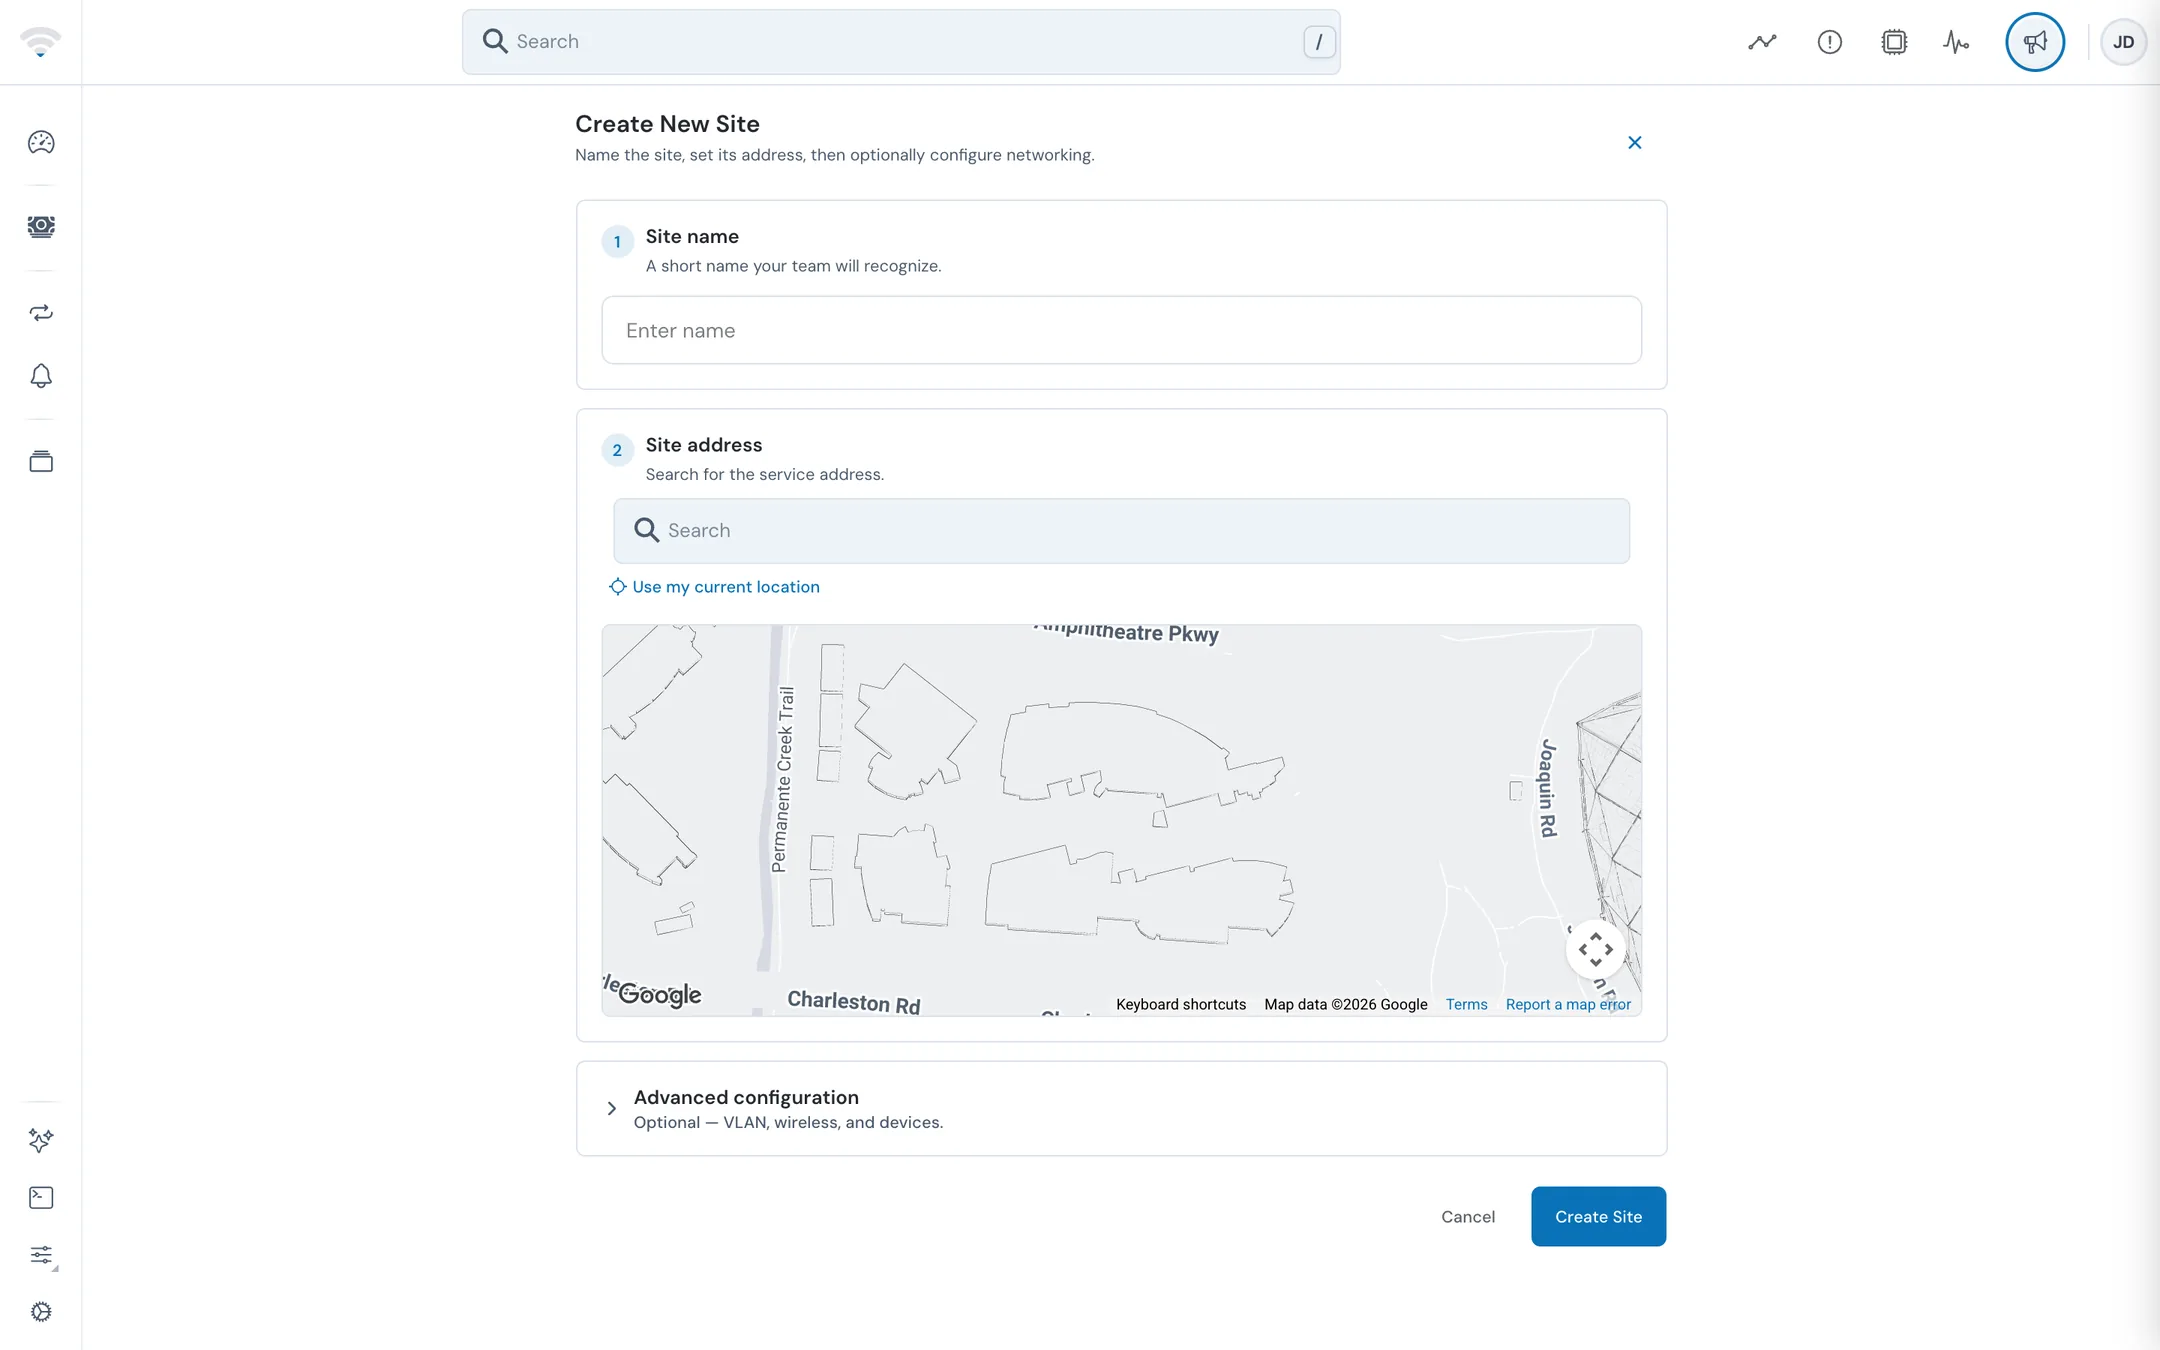
- On the Dashboard, click Create New Site.
- Under Site name, enter a short name your team will recognize, such as "Main Office".
- Under Site address, search for the site's service address and pick it from the results. Or click Use my current location to use your browser's location. The map shows the address you picked.
- Optional: click Address details to check or edit Street Address, City, State, Zip Code, County, and Suites. To pick a different address, click Change.
- Optional: open Advanced configuration to set up networking now (see below).
- Click Create Site.
ReadyView won't create the site until you've picked an address. If your browser blocks location access, search for the address instead.
#Advanced configuration
These settings are optional. You can set all of them later from the site's settings.
| Setting | What it does |
|---|---|
| VLAN | Turn it on to create one or more wired VLANs. For each, enter a VLAN name, a VLAN number from 1 to 4094, and a VLAN color. Click Add VLAN for another. |
| Wireless | Turn it on to add one or more SSIDs for wireless clients. For each, enter the SSID Name, a Password of 8 to 63 characters, and a VLAN ID from 1 to 4094. Click Add SSID for another. |
| Devices | Click Select devices to choose devices already in your organization. They move into the new site. |
If the site is created but the VLAN or wireless settings can't be applied, ReadyView says so. The site still exists. Set up the networks from its settings.
#Switch organizations
If your account belongs to more than one organization:
- Click Change Organization in the left rail, or press Ctrl+Y (⌘Y on a Mac).
- In Select Organization, search for the organization or scroll to it.
- Click the organization to switch to it.
#Related guides
Last updated November 10, 2026