Floor plans
Upload building plans, place devices and IDF racks on them, see connections, AP coverage, and traffic, view every floor stacked as a building, and trace a device's connections across floors.
Floor Plans puts the site's devices on images of your building. Use it to find where a device is, see how devices connect across a floor, estimate access point coverage, and keep IDFs and racks in the right place. Open it from Network > Floor Plans in a site's left rail.
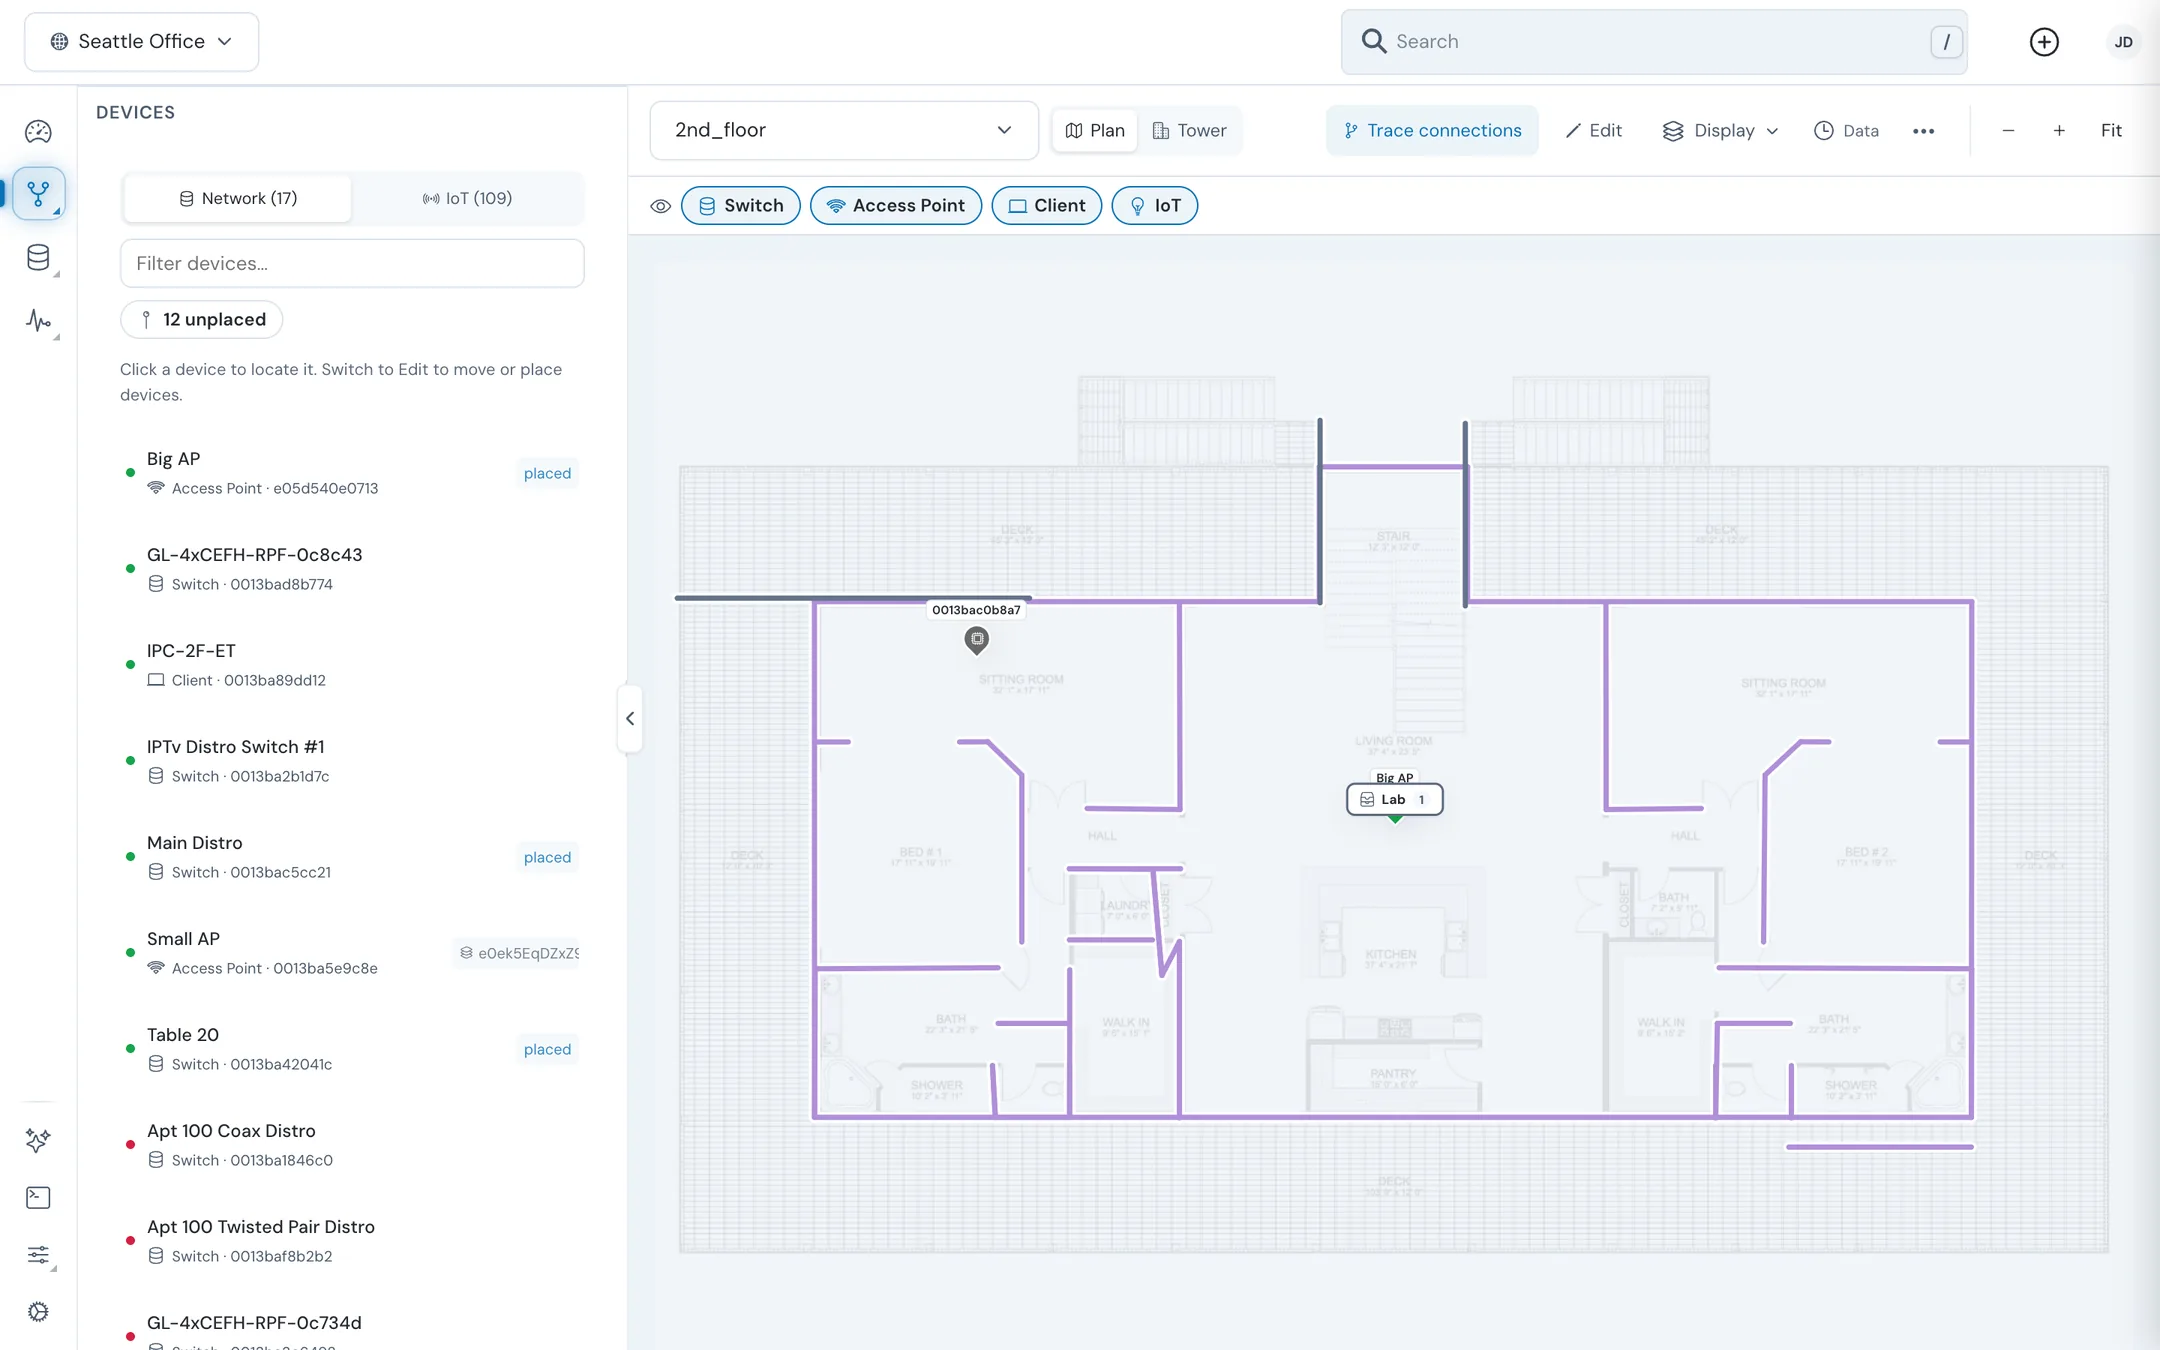
#The page at a glance
| Area | What it's for |
|---|---|
| Devices panel (left) | Every device on the site, with which ones are placed. See The device list. |
| Plan dropdown | Pick which floor plan to show. |
| Plan / Tower | One floor flat, or every floor stacked as a building. See Tower view. |
| Trace connections | Follow a device's connections across floors. See Trace connections. |
| Edit | Switch to editing: place devices, draw walls, add IDFs, upload plans. Shown as Done editing while you edit. |
| Display | Choose overlays. See Show connections, coverage, and traffic. |
| Data | When each kind of data was last fetched. See Check data freshness. |
| More (…) | Upload, rename, replace, download, or delete plans, and Take a Tour. |
| Zoom | Zoom out, zoom in, and Fit. |
Below the toolbar, the Switch, Access Point, Client, and IoT chips show or hide each kind of device on the plan.
#The device list
The Devices panel has two tabs: Network (switches, access points, and ReadyLink clients) and IoT (devices from the IoT list). Each row shows the device's status, name, type, and MAC address. IoT rows show the vendor and what the device is connected to.
- placed means the device is on the plan you're viewing. A layers icon with a plan name means it's placed on a different plan.
- Click the N unplaced chip to list only devices that aren't on any plan yet. Click it again to show all.
- Type in Filter devices… to search.
- Click a device to find it. On the plan view, the plan moves to it; in Tower view, you jump to the floor it's on.
#Upload a floor plan
Editing, uploading, and deleting plans each need the matching floor plan permission in your role.
- Click Edit. On a site with no plans, click Upload floor plan in the middle of the page instead and skip to step 3.
- Open More (…) and click Upload floor plan.
- Choose an image or PDF: PNG, JPG, GIF, WebP, SVG, or PDF.
- In New floor plan, enter a name (it starts as the file name), for example
Building A — Floor 2, and click Create.
A PDF stays sharp at every zoom. A PDF over 12 MB is imported as an image instead, so zoom detail is limited; shrink the PDF to keep it sharp.
Include the floor number in the plan name, such as Floor 2. Tower view reads it to stack the floors in order.
To change a plan later, use More > Rename, Replace image (keeps every placement), or Delete plan while editing.
#Place devices
- Click Edit.
- Drag a device from the Devices panel onto the plan.
- Drag a placed device to move it.
- Click Done editing.
To take a device off the plan, click it while editing and click Remove from plan.
#Add an IDF or rack
- While editing, click Add IDF / rack in the drawing tools.
- Name it, for example
IDF-2. A marker appears on the plan. - Drag devices onto the marker to add them. Drag the marker's edge to size the IDF area, and set its Color and Opacity.
- Click Rack view to see the rack. Click a device's unit to Set rack unit (U), use Move up and Move down, or Renumber from U1.
Deleting a group returns its devices to the unplaced list. The racks you build here appear on the Infrastructure page.
#Draw walls and set the scale
AP coverage needs a scale and walls. While editing, use the drawing tools:
- Set scale: click two points a known distance apart, enter the distance, and click Save (meters) or Save (feet).
- Walls: click to chain wall segments, and click the last point again to finish. Choose a material: Drywall, Concrete, Glass, Wood, Brick, or Metal. To start faster, click Auto-detect or AI detect to find walls in the image. Ctrl+Z undoes detected walls.
- Select a wall to change its material, or press Delete (or click Remove wall) to remove it.
For a directional access point, click it while editing and use Aim to point it.
#Route and name cables
While editing, click Route cables. Click a cable to pick it, then click along it to add bends. Drag a bend to move it, or tap it to remove it. Straighten removes every bend, and Name cable gives the cable a name such as IDF-2 uplink.
#Show connections, coverage, and traffic
Open Display in Plan view:
| Option | What it shows |
|---|---|
| Connections | The LLDP links between placed devices |
| AP coverage | Estimated Wi-Fi coverage from each placed access point, for one band at a time. Needs a scale and walls first. |
| Traffic heat map | Traffic on this floor, read from the switches placed on it |
| Plan opacity | Fades the plan image (15–100%) so devices stand out |
#Act on a device
Click a placed device. The card shows its MAC address, type, status, and, for a switch, its ports. IoT devices show what they're connected to, and access points show how many clients are connected. The buttons are:
- Trace connections: start a trace from this device.
- View details: open the device's panel. See Switch, access point, and client details.
- Reboot: for an online switch or access point, if your role allows it. For a switch you can Save config & reboot or just Reboot.
#Trace connections
A trace follows a device's reported connections, floor by floor.
- Click Trace connections, then choose a starting device.
- The trail shows the device's connected devices, grouped On this floor, On other floors, and Not placed on a floor. Each connection says whether it's a wired attachment, a Wi-Fi association, or from the topology.
- Click a connected device to follow it. Click Show on floor plan to see where it is, or Back to step back.
- Click Start over to begin again.
#Tower view
Click Tower to see every floor plan stacked as a building.
- Drag to orbit, and Ctrl+scroll to zoom. Adjust Floor spacing and Viewing angle, or click Reset view.
- Click a floor to see its device count, then Open floor plan to go to it.
- If a floor is in the wrong place, click Set floor level, enter the level, and click Apply.
#Check data freshness
Data lists when ReadyView last fetched Floor plans, Inventory, Endpoints, and Topology. Device data refreshes every 30 seconds while the page is visible and floor plans every 2 minutes. Plans don't refresh while you're editing. Click Refresh data to fetch now. The button reads Check data when something needs your attention.
#Download floor plans
Open More > Download and choose Download PNG or Download PDF. With more than one plan, All floor plans… lets you choose which floors to include and their order, then Download PDF or Download PNGs.
#Related guides
Last updated November 10, 2026